redis

Every user that Redis is enabled for has their own socket (ie: socket would be /home/TheirUserName/.redis/redis.sock). They set the socket as the address and port number to 0 (zero). That's worked on just about every plugin I have tested with. I primarily have it setup with WordPress and OpenLiteSpeed with the plugin setup like that.
yes it makes db socket per user by enabling redis from their hosting panels. the web server is openlitespeed.
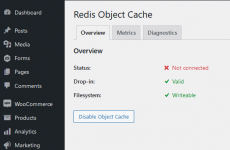
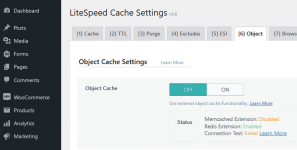
I have tested 2 plugins (seprately) but the result:

screenshot-1.pngscreenshot-2.png
 
Make sure the socket exists at /home/TheirUserName/.redis/redis.sock

If it's there it should be working.

And in the LiteSpeedCache plugin just below your screen shot, make sure it's set to Redis, and that the host is the full path like above to the socket. And also the Port Number must be 0 (Zero)
 
I have the same set up, OpenLiteSpeed, Redis, and Wordpress.

The only plug in you need is LiteSpeedCache.

On the Object Tab

Object Cache = On
Method = Redis
Host = localhost
Port = 6379 (Unless you've changed it)
Default Object Lifetime = 360 seconds
Redis Database ID = a value from 1-16

Not sure how many wordpress sites you're hosting, but you can set up separate instances of Redis and I thought I read that using different database IDs can help performance / security. (That is what I do at least and it does work).
 
Make sure the socket exists at /home/TheirUserName/.redis/redis.sock

If it's there it should be working.

And in the LiteSpeedCache plugin just below your screen shot, make sure it's set to Redis, and that the host is the full path like above to the socket. And also the Port Number must be 0 (Zero)
I checked and there is a socket file in the address you mentioned but it is empty. also as openlitespeed says if you are using redis socket method then the port must be 0 and also I set it on the port 0
but again connection test failed (lite speed cache)
I used this commands and connection test passed:
Code:
yum install epel-release
yum install redis
systemctl start redis

I guess it shoud not be true cause the caustombuild should handle it by it self
 
Last edited:
You should let custombuild handle it and not install it from packages. Make sure redis is configured in the advanced settings and build it. And that the php module is enabled. Installing it from packages and set in custombuild may cause problems.
 
I think, the most confusion is coming because of redis get installed by antispamsoftware, and must be installed at serverlevel and php plugin on the other side for consumer use.
To the most people its still quite unclear, how they install or update Redis inside Directadmin, given this fact mixed with the Pro Pack.
Some want to use standard linux technices, some going to buy Pro Pack.
 
Hello all,
Sorry for reviving an old topic..
i've been reading up on installing Redis, but i'm confused..

I do not have a 'Pro Pack' license, and i do not have rspamd installed (i have SpamAssassin)..

i tried following the instructions in the official documentation but i've not gotten far..
i ran the commands
Code:
./build set redis yes
./build redis

Now i see the option to 'check' Redis in the packages, and Redis shows as disabled in the user info..

But i can't find any evidence that anything has actually happened aside from the current source tarball, named redis-7.0.0.tar.gz has been downloaded to /usr/local/directadmin/custombuild/

the build process ended with the following lines:
Code:
Hint: It's a good idea to run 'make test' ;)

make[1]: Leaving directory '/usr/local/directadmin/custombuild/redis-7.0.0/src'
Make complete
Installing redis-7.0.0...
cd src && make install
make[1]: Entering directory '/usr/local/directadmin/custombuild/redis-7.0.0/src'
    CC Makefile.dep

Hint: It's a good idea to run 'make test' ;)

    INSTALL redis-server
    INSTALL redis-benchmark
    INSTALL redis-cli
make[1]: Leaving directory '/usr/local/directadmin/custombuild/redis-7.0.0/src'
Done redis.
Enabling redis in systemd...

However, it doesn't seem Redis was actually installed..
Should i install redis from that tarball? (it's identical to the one on the Redis website)

Any help would be greatly appreciated (just to be clear, i did read multiple times all of the above and linked posts, but found little solace)
Thank you all!
 
As stated in the link you posted, this is a Pro-Pack only feature, so it probably won't work without the Pro-Pack. If you want to make use of redis cache without the Pro Pack, you would have to do all the configuration yourself, outside of Directadmin.
 
On some servers we're using the Redis build from CB as well without the Pro Pack and configure it for individual users manually (not via DirectAdmin of course). Works perfect so far. Why do you think it isn't installed of running the build script?
 
Thank you fellas; i don't think anything got installed because if i try commands like:
service start redis
service start redis-cli
service start redis-server

they all answer something like Unit redis-server.service could not be found..

i'm gonna try to 'make install' and see how it goes..
then, i guess i have to get the redis.sock in the appropriate user folder; i'll post results here..


EDIT:
ok, now i've got Redis up and running because when i type:
redis-server /usr/local/directadmin/custombuild/custom/redis/redis.conf

it works..

except i'm not sure how to create the socket..
it's so odd.. if i run (as root):

service redis@USER status

it returns:
Code:
Redirecting to /bin/systemctl status [email protected][email protected] - Multi-user redis persistent key-value database
   Loaded: loaded (/etc/systemd/system/[email protected]; disabled; vendor preset: disabled)
   Active: inactive (dead)
     Docs: http://redis.io/documentation,
           man:redis-server(1)
 
Last edited:
This is my cheatsheet, change username to your own user of course. In theory this could also ensure forward compatibility should you ever switch to the Pro Pack.

Code:
cd /home/username
sudo -u username mkdir .redis
chmod 770 .redis

sudo -u username mkdir .redis/db
chmod 770 .redis/db

sudo -u username touch .redis/redis.sock
chmod 770 .redis/redis.sock

touch /usr/local/directadmin/data/users/username/redis.conf
chown diradmin.username /usr/local/directadmin/data/users/username/redis.conf
chmod 640 /usr/local/directadmin/data/users/username/redis.conf

systemctl daemon-reload
systemctl enable redis@username
systemctl start redis@username
 
Ok, i got it!!
Thank you all so much..

i just figured i'd give an A-to-Z summary of the procedure to enable Redis for one or more users in the non-Pro version of Directadmin..

there are a few things you'll need to replace first:
replace USERNAME as appropriate
replace PASSWORD as appropriate
replace php74 as appropriate
replace /usr/local/php74/lib/php/extensions/no-debug-non-zts-20190902/ as appropriate (see below)
replace maxmemory 512MB as appropriate
replace maxmemory-samples 6 as appropriate

First, install the general components (you can just copy-paste into terminal):
Code:
cd /usr/local/directadmin/custombuild/build; \
.build set redis yes; \
.build redis; \
\
cd /usr/local/php74/bin; \
./pecl install igbinary igbinary-devel; \
./pecl install redis;
answer yes to the question:
"enable igbinary serializer support? [no] :"

Now, to find the path to the php extensions:
Code:
ll /usr/local/php74/lib/php/extensions;

For me, that was:
/usr/local/php74/lib/php/extensions/no-debug-non-zts-20190902/
you need to replace that with your own below..

Then run this to add the necessary PHP extensions in order to access Redis from PHP (like, for WordPress):
Code:
echo "extension=/usr/local/php74/lib/php/extensions/no-debug-non-zts-20190902/redis.so" >> /usr/local/php74/lib/php.conf.d/10-directadmin.ini; \
echo "extension=/usr/local/php74/lib/php/extensions/no-debug-non-zts-20190902/igbinary.so" >> /usr/local/php74/lib/php.conf.d/10-directadmin.ini; \
killall -9 lsphp;
(that last line is for LiteSpeed, i imagine for Apache PHP-FPM, it would be 'service php-fpm restart', and for Apache, it's probably 'service apache2 restart')

Now, to enable it for a given USERNAME (make sure to replace every instance of USERNAME, PASSWORD, etc.. with the correct values):
Code:
sudo -u USERNAME mkdir /home/USERNAME/.redis; \
chmod 770 /home/USERNAME/.redis; \
\
sudo -u USERNAME mkdir /home/USERNAME/.redis/db; \
chmod 770 /home/USERNAME/.redis/db; \
\
sudo -u USERNAME touch /home/USERNAME/.redis/redis.sock; \
chmod 770 /home/USERNAME/.redis/redis.sock; \
\
touch /usr/local/directadmin/data/users/USERNAME/redis.conf; \
chown diradmin.USERNAME /usr/local/directadmin/data/users/USERNAME/redis.conf; \
chmod 640 /usr/local/directadmin/data/users/USERNAME/redis.conf; \
\
{ echo "supervised systemd"; \
echo "port 0"; \
echo "unixsocket /home/USERNAME/.redis/redis.sock"; \
echo "unixsocketperm 770"; \
echo "requirepass PASSWORD"; \
echo "maxmemory 512MB"; \
echo "maxmemory-samples 6";  } > /usr/local/directadmin/data/users/USERNAME/redis.conf; \
\
systemctl daemon-reload; \
systemctl enable redis@USERNAME; \
systemctl start redis@USERNAME;

Finally, when it comes time to configure LiteSpeed Cache, or whatever PHP tool will be used to connect to Redis,
in the 'hostname' or 'IP address' field, you need to enter:
/home/USERNAME/.redis/redis.sock

You'll need to enter the password you provided in the config, and the port is 0
 
Last edited:
Aside from the matters above, there seems to be an error with the startup configuration for rspamd:

Code:
May 24 11:45:58 xx redis-server[3182205]: *** FATAL CONFIG FILE ERROR (Redis 7.0.0) ***
May 24 11:45:58 xx redis-server[3182205]: Reading the configuration file, at line 7
May 24 11:45:58 xx redis-server[3182205]: >>> 'save "900 1"'
May 24 11:45:58 xx redis-server[3182205]: Invalid save parameters
 
Ok, i got it!!
Thank you all so much..

i just figured i'd give an A-to-Z summary of the procedure to enable Redis for one or more users in the non-Pro version of Directadmin..

there are a few things you'll need to replace first:
replace USERNAME as appropriate
replace PASSWORD as appropriate
replace php74 as appropriate
replace /usr/local/php74/lib/php/extensions/no-debug-non-zts-20190902/ as appropriate (see below)
replace maxmemory 512MB as appropriate
replace maxmemory-samples 6 as appropriate

First, install the general components (you can just copy-paste into terminal):
Code:
cd /usr/local/directadmin/custombuild/build; \
.build set redis yes; \
.build redis; \
\
cd /usr/local/php74/bin; \
./pecl install igbinary igbinary-devel; \
./pecl install redis;
answer yes to the question:
"enable igbinary serializer support? [no] :"

Now, to find the path to the php extensions:
Code:
ll /usr/local/php74/lib/php/extensions;

For me, that was:
/usr/local/php74/lib/php/extensions/no-debug-non-zts-20190902/
you need to replace that with your own below..

Then run this to add the necessary PHP extensions in order to access Redis from PHP (like, for WordPress):
Code:
echo "extension=/usr/local/php74/lib/php/extensions/no-debug-non-zts-20190902/redis.so" >> /usr/local/php74/lib/php.conf.d/10-directadmin.ini; \
echo "extension=/usr/local/php74/lib/php/extensions/no-debug-non-zts-20190902/igbinary.so" >> /usr/local/php74/lib/php.conf.d/10-directadmin.ini; \
killall -9 lsphp;
(that last line is for LiteSpeed, i imagine for Apache PHP-FPM, it would be 'service php-fpm restart', and for Apache, it's probably 'service apache2 restart')

Now, to enable it for a given USERNAME (make sure to replace every instance of USERNAME, PASSWORD, etc.. with the correct values):
Code:
sudo -u USERNAME mkdir /home/USERNAME/.redis; \
chmod 770 /home/USERNAME/.redis; \
\
sudo -u USERNAME mkdir /home/USERNAME/.redis/db; \
chmod 770 /home/USERNAME/.redis/db; \
\
sudo -u USERNAME touch /home/USERNAME/.redis/redis.sock; \
chmod 770 /home/USERNAME/.redis/redis.sock; \
\
touch /usr/local/directadmin/data/users/USERNAME/redis.conf; \
chown diradmin.USERNAME /usr/local/directadmin/data/users/USERNAME/redis.conf; \
chmod 640 /usr/local/directadmin/data/users/USERNAME/redis.conf; \
\
{ echo "supervised systemd"; \
echo "port 0"; \
echo "unixsocket /home/USERNAME/.redis/redis.sock"; \
echo "unixsocketperm 770"; \
echo "requirepass PASSWORD"; \
echo "maxmemory 512MB"; \
echo "maxmemory-samples 6";  } > /usr/local/directadmin/data/users/USERNAME/redis.conf; \
\
systemctl daemon-reload; \
systemctl enable redis@USERNAME; \
systemctl start redis@USERNAME;

Finally, when it comes time to configure LiteSpeed Cache, or whatever PHP tool will be used to connect to Redis,
in the 'hostname' or 'IP address' field, you need to enter:
/home/USERNAME/.redis/redis.sock

You'll need to enter the password you provided in the config, and the port is 0
This along with what @tristan shared worked great for me...

But when I want to flush Redis cache, I am unable to access the Redis CLI. Keep getting this error:

Code:
[root@server ~]# redis-cli status
Could not connect to Redis at 127.0.0.1:6379: Connection refused

Any idea how to access the Redis CLI?
 
Every user that Redis is enabled for has their own socket (ie: socket would be /home/TheirUserName/.redis/redis.sock). They set the socket as the address and port number to 0 (zero). That's worked on just about every plugin I have tested with. I primarily have it setup with WordPress and OpenLiteSpeed with the plugin setup like that.
Would this work if one doesn't have the pro-pack? Could you share an example of the /home/TheirUserName/.redis/redis.sock file?
 
Back
Top